Printing Yodel Labels in One Stop Order Processing
The latest One Stop Order Processing feature allows you to print your Yodel postage labels directly from the software.
This feature is available in the Professional, Premium and Enterprise subscriptions of One Stop Order Processing.
This integration requires you to have a Yodel account through Netdespatch (this can be done here).
When printing the Royal Mail labels through One Stop Order Processing, a 6x4 or 8x4 label can be printed which contains all of the information you will need
Step 1. How to Print Yodel Labels in One Stop Order Processing-
You can watch our video guide by clicking here.
1. Setting up your Yodel Netdespatch account
The following steps show you how to set up your NetDespatch account.
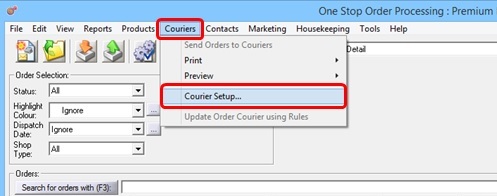
You can setup the new courier integration by going to Couriers / Courier Setup (as shown below):
2. Then click on 'Setup Couriers':
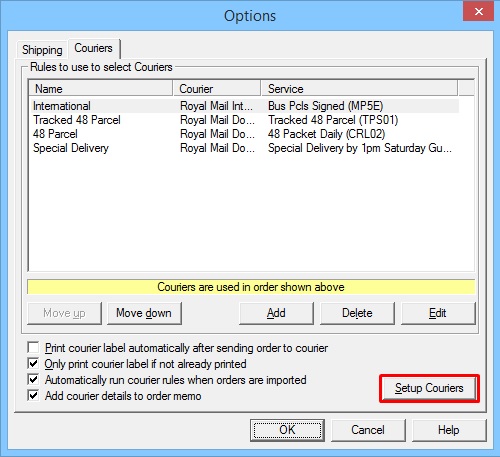
3. The Setup Couriers dialog (shown below) is where you configure the settings for both your Yodel Domestic and International accounts.
|
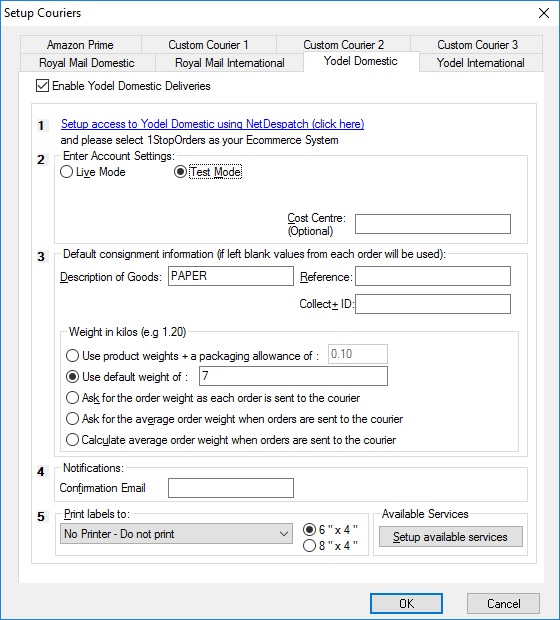
1) Yodel Settings: |
By clicking on the link, you will be taken to the form required to create a NetDespatch account. |
|
2) Enter Account Settings: |
This is where you enter your account details, you will be provided with credentials for both Royal Mail Domestic and International. |
|
3) Default consignment information (if left blank values from each order will be used): |
This is where you enter the default description and instructions to be sent with the consignment of the goods being sent. If left blank, this will use the Item Title and Shipping Instructions.
The reference field allows you to enter a default order reference, by default this uses the Order number and which is located on the label. In this field, you can use any of the macros at this link. |
|
4) Weight in kilos: |
This option will use the weight entered in the products area and allows you to add a packaging allowance.
You can enter a default weight here which will be used for all orders being sent to Royal Mail.
This option will ask for each individual orders weight as soon as it is sent to the courier
After you have clicked 'Send to courier' for a group of orders, you will be asked an average weight for these consignments. |
| 5) Notifications: |
Confirmation Email and POD Email:
By entering your email address in these fields, you will be sent an email when the order has been confirmed and a proof of delivery email. |
| 6)Print labels to: |
You can choose which printer to send the labels to by selecting the printer in the dropdown menu. This will use the default paper and margins of the selected printer (E.g. a 6x4 label printer). |
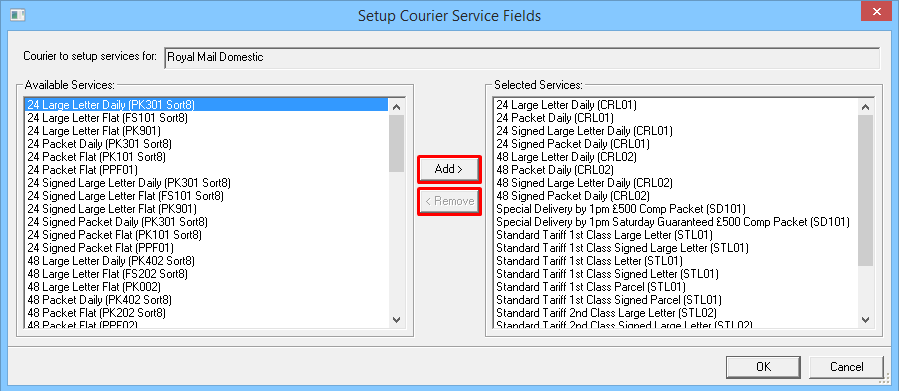
2. Setup Available Services:
This is where you select the services you would like to use for your orders being sent with Yodel.
The services shown on the left are the ones that are available, the right hand side are the services that you have selected and will be available to use.
You can add the available services by selecting them on the left and clicking the 'Add' button.
You can remove the selected services by selecting them on the right and clicking the 'Remove' button.
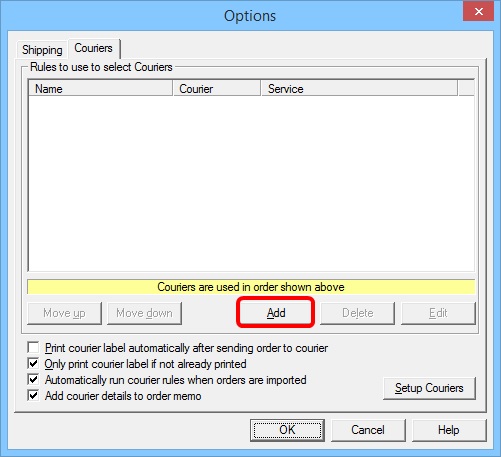
3.Setting up rules for the shipping services
In One Stop Order Processing, you will create a set of rules to define which service should be used for orders.
1. To setup the rules for each service, go to Couriers / Courier Setup (as shown below):
2.This is where the rules you set up will be located, click on 'Add' to create a rule for a service.
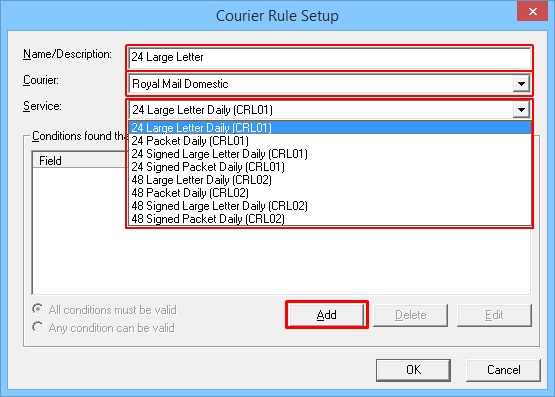
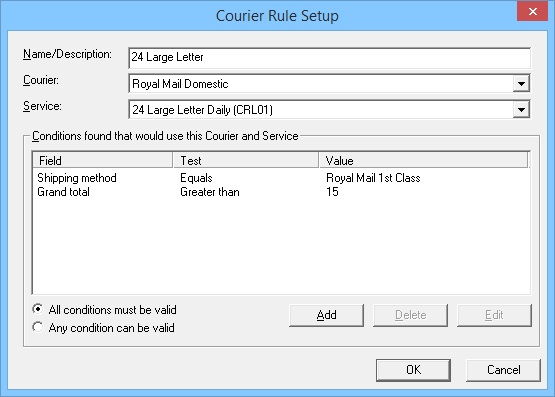
3. The area at the top of this dialog is where you select the service you are going to setup.
Name/Description: This is where you enter a name for the rule.
Courier: Choose whether the courier is Domestic or International.
Service: Select the service you would like to use.
Click on 'Add' to create the conditions for this service.
4.The 'Condition to Test For' dialog is where you create the conditions to test the orders on when they are imported.
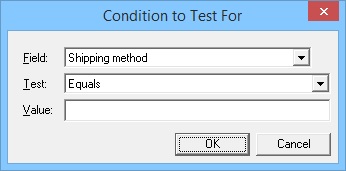
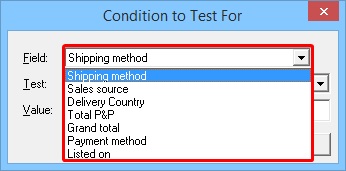
5. Field: This is where you select a field from the order to test on (there are over 30 fields to test on including Custom Values).
6.Test: Once you have chosen a field to test on, you will choose how to test the Value that is set at the bottom.
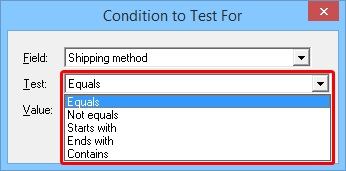
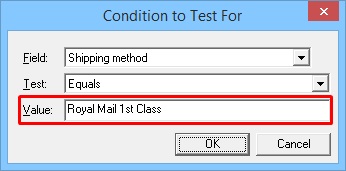
7.Value: This is the value that needs to be met, shown in the example below, the selected service will be used when the Shipping Method selected by the customer is equal to 'Royal Mail 1st Class'.
8. You can add as many conditions as you like to a service.
There are two options at the bottom that allow you to specify whether the conditions created should all be met or just one of them to be valid.
9.This is where you will see all of the services that have been set up, once you are happy that all the services you use have been added here, you can start running the rules as the orders are imported and start creating the labels.
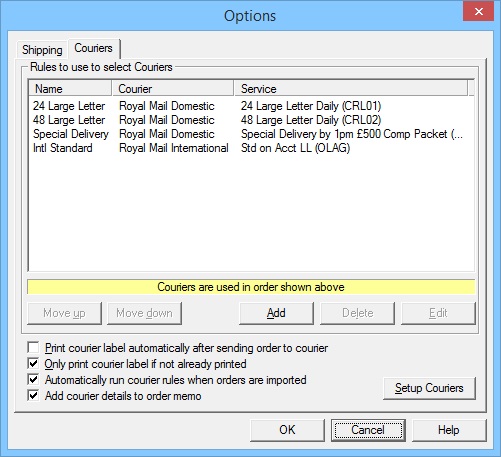
NOTE: If you want to have a default (catch all) courier service to use if none of the detailed rules are used you should create a new rule without any tests and make that Rule the one in the list (move it to the bottom of the list of rules).
4. Sending orders to the courier and printing the labels
On the main One Stop Order Processing screen, there are two buttons at the bottom that you will use to create the labels and print them.
1. To create the label, you will need to tick the orders you are using with Royal Mail and click on the 'Send to Courier' button.
Once the label has been created, the 'Print Labels' button will print the 6x4 label to the printer setup.
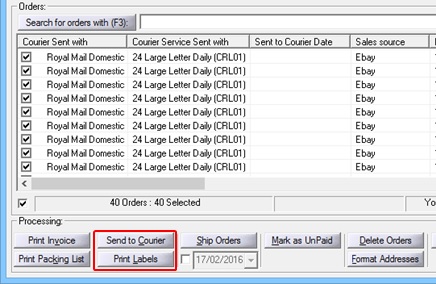
2. If you use a service that has a tracking number, they will automatically be added to the order which can then be sent to Amazon or eBay when shipping the order. (For more information on this feature click here)
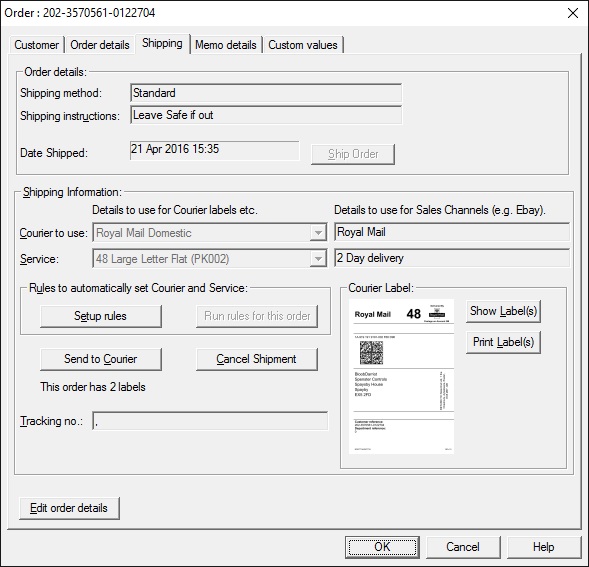
There is support for both Domestic and International orders, allowing you to print a CN22 Form for required orders along with the 6x4 labels. The CN22 form is printed as a second label. When you print your international labels the CN22 form will be printed immediately after the label that it relates to (and CN22 will be printed on the main label)
5.Printing the 6x4 label onto Integrated Label paper
You can use 6x4 Integrated Label paper with this new courier integration, to set this up you will need to go to Tools / Options / Invoice Options / Click Integrated labels under Stationery to use and in the dropdown menu next to 'Select report' use the 'Invoice with Integrated Courier Label (CL)'.
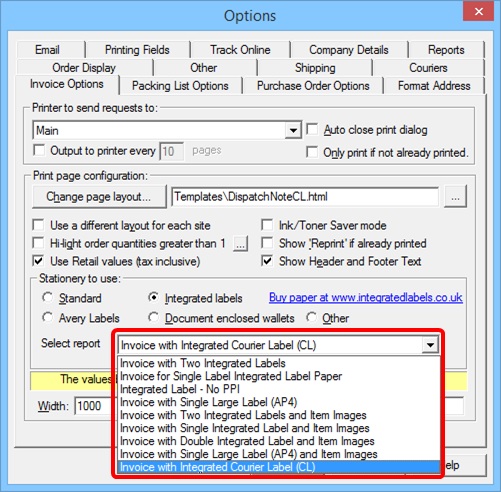
The 6x4 Courier Label Integrated Label paper will be available at www.1stoporders.co.uk
|
Using One Stop Order Processing with eBay, Amazon, Magento, Shopify, Etsy,�Onbuy, Flubit, X-Cart, eBid, SellerDeck, Oxatis, CubeCart, osCommerce, Interspire,CRE Loaded, ekmPowershop, Pinnacle Cart, Rakuten, RomanCart, Paypal, Asos, WooCommerce , PrestaShop, Groupon, Weebly, Mail Order, Telephone Sales, CDiscount,OpenCart, Channel Advisor, Royal Mail, MyHermes, UKMail, DPD, Yodel, UPS, Metapack, Parcel 2 go, Quickbooks, Sage, Xero, Parcelforce and Stripe |
|
|
|
Related Articles
Printing Yodel Labels in One Stop Order Processing
The latest One Stop Order Processing feature allows you to print your Yodel postage labels directly from the software. This feature is available in the Professional, Premium and Managed subscriptions of One Stop Order Processing. This integration ...How to Generate Parcelhub Labels from Within One Stop Order Processing
The following guide contains an overview of using ParcelHub with One Stop Order Processing, including how to generate labels and add services. This feature is available in the Professional, Premium and Managed subscriptions of One Stop Order ...How to Generate Yodel Labels within One Stop Order Processing
The following guide contains an overview of using Yodel with One Stop Order Processing, including how to generate labels and add services. This feature is available in the professional, Premium and Managed subscriptions of One Stop Order Processing ...How to create test Yodel courier labels from within One Stop Order Processing
This feature is available in the Professional, Premium and Enterprise subscriptions of One Stop Order Processing. You can use the Netdespatch integration in test mode, this will allow you to create test labels for Uk Mail royal mail and Yodel. How ...How to increase the number of days you can view your Yodel courier labels in One Stop Order Processing
The following guide explains how you can alter the number of days courier labels are kept in One Stop Order Processing for. This feature is available in the Professional, Premium and Managed subscriptions of One Stop Order Processing. How to increase ...