How to import your WooCommerce orders into One Stop Order Processing
The following guide will show you how to export and download the order file from your WordPress WooCommerce store then import it into One Stop Order Processing.
This feature is available in the Lite, Professional, Premium and Managed subscriptions of One Stop Order Processing.
How to import WooCommerce Orders-
You will need to install a plugin to download the order file from your WooCommerce store, the following link is where you can download and install the plugin:
https://wordpress.org/plugins/order-export-and-more-for-woocommerce/
There is a free and paid for version of the plugin to export the orders.
The free version of the plugin allows you to import the basic order details along with the delivery information, the paid for version includes more detailed information on the order along with the invoice details.
Once you have downloaded and installed the WooCommerce plugin, use the following steps to download the order file and set up the import.
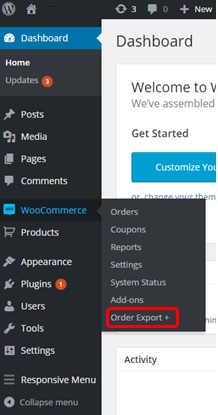
1)On the side panel in your WordPress admin control panel, under WooCommerce you will see an option in the dropdown list called 'Order Export +', click on this.
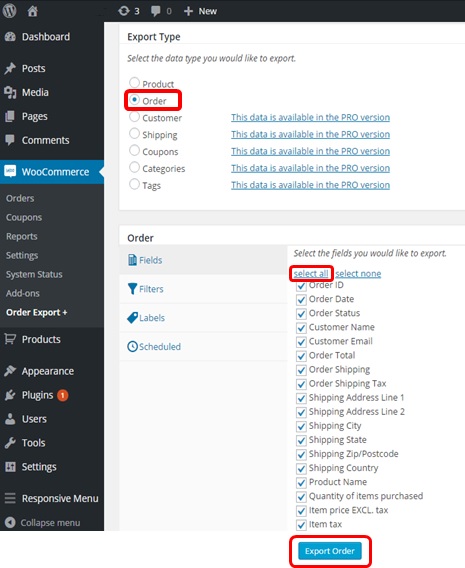
2) Now you need to select 'Order' from the options listed below and click on 'select all' which is just above the list of fields included in the export.
Once you have done this click on the 'Export Order' button at the bottom of the page, this will create a CSV file with all of your latest orders in.
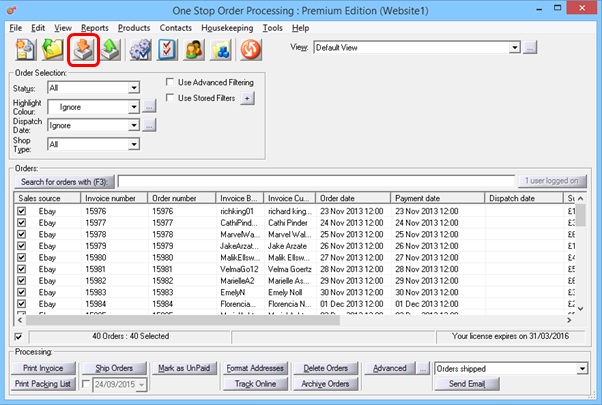
3) Now you have downloaded the order file, you will need to set up the WooCommerce import in One Stop Order Processing.
Click on the Import button to open the Import Orders dialog.
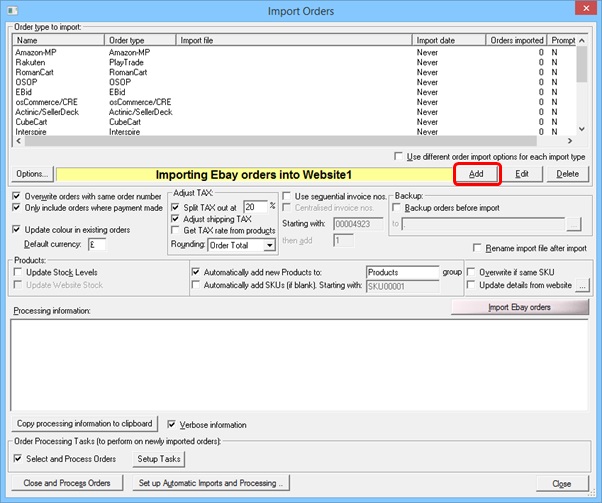
4) You will need to create a new OSOP import, to do this click on 'Add'.
5) Select the 'Other Shopping Carts, CSV import (OSOP Format)' import type and click 'Next'.
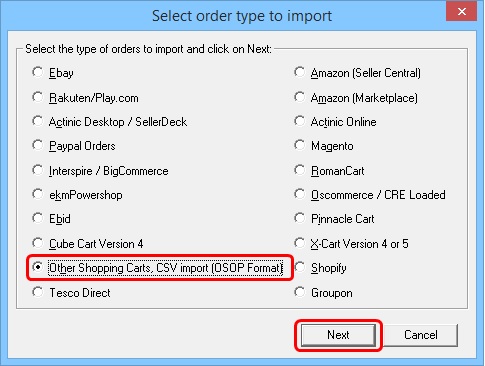
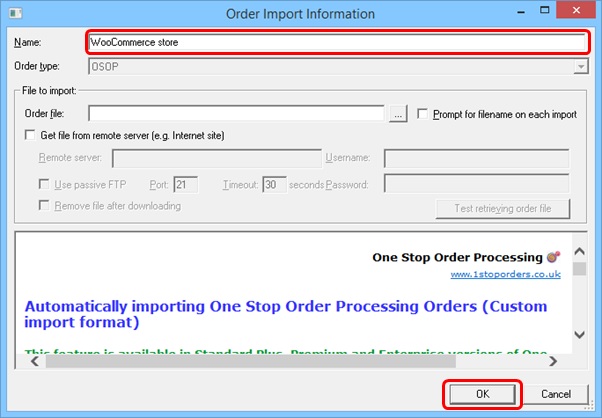
6) Give the import a name at the top of this dialog. Then select the exported CSV file from the exporter by clicking on the '...' button, then click 'OK'.
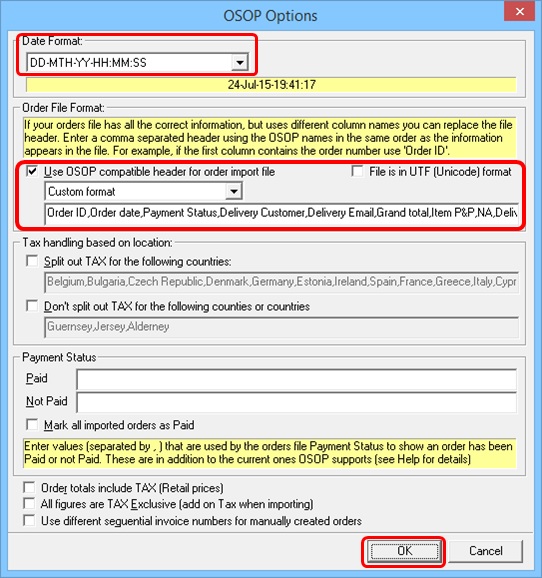
7) In the OSOP Options dialog, select the 'DD-MTH-YY-HH:MM:SS' date format at the top. Then tick the 'Use OSOP compatible header for order import file' option. Copy and paste the relevant header line displayed in the box shown below and click 'OK' to continue.
If you are using the free version of the plugin, copy the following header:
Order ID,Order date,Payment Status,Invoice Customer,Invoice Email,Grand total,Item P&P,NA,Delivery Address line 1,Delivery Address line 2,Delivery Address line 3,Delivery County,Delivery Postcode,Delivery Country,Item title,Item quantity,Item price,Item tax,NA,Item title2
If you are using the paid for version of the plugin, copy the following header:
Order ID,Order date,Payment Status,Invoice Customer,Invoice Email,Grand total,Item P&P,NA,Delivery Address line 1,Delivery Address line 2,Delivery Address line 3,Delivery County,Delivery Postcode,Delivery Country,Item title,Item quantity,Item price,Item tax,NA,Item title2,Currency,Discount,NA,Payment method,Shipping method,Total weight,Notes,Invoice Address line 1,Invoice Address line 2,Invoice Address line 3,Invoice County,Invoice Postcode,Invoice Country,Invoice Telephone
Related Articles
How to import your CDiscount orders into One Stop Order Processing
The following guide explains how to import C Discount Orders into One Stop Order Processing. This feature is available in the Lite, Professional, Premium and Managed subscriptions of One Stop Order Processing. You can now import your C Discount ...When I import my orders can I process orders in batches in One Stop Order Processing?
The following guide will explain how to process orders in batches when importing within One Stop Order Processing. This feature is available in the Professional, Premium and Enterprise subscriptions of One Stop Order Processing. As a default this is ...How to import your osCommerce orders into One Stop Order Processing
How to import orders from osCommerce/CRE Loaded into One Stop Order Processing. This feature is available in the Lite, Professional, Premium and Managed subscriptions of One Stop Order Processing. How to download Orders from osCommerce/CRE Loaded- 1 ...Automatically import Amazon seller central orders into One Stop Order Processing
One Stop Order Processing www.1stoporders.co.uk This feature is available in Professional, Premium and Managed versions of One Stop Order Processing One Stop Order Processing can automatically retrieve orders from Amazon SellerCentral using Amazon ...How to automatically import your product details into One Stop Order Processing
The following guide explains how to import all active listings from eBay and Amazon. This feature is available with the Premium and Enterprise subscriptions of One Stop Order Processing. Active listings can be imported from the supported sites (E.g. ...