How to export orders to Sage
This feature is available in Professional and Premium versions of One Stop Order Processing
This solution uses One Stop Order Processing and Sage (All versions except Startup)
You can import your Orders into Sage as a series of Invoices, into a selected account. All invoices are imported as a single customer (Sales) for a single product (Goods). The total invoice cost and VAT is split into the relevant accounts.
The following instructions explain how to set this up.
1 If you are using V38 or above you can import your Sage view by clicking the menu option View-> Add-> Accounts -> then either select the view Sage or Sage One.
2 Click on the Export Orders button (![]() ) and select Sage.
) and select Sage.
This will create a CSV file in the root of drive C. If required, you can change the name by selecting the Sage View and selecting the View->Change Export Options menu option or click on the '...' button to the right of the View selection field
( ).
).
3 Start Sage.
4 Below is a description of where the order information is imported into. You either need to make sure that the accounts (And items) exist in Sage or amend the default values, shown below, to match your setup.
| Field | Description | Default Value |
| Account Reference | The customer account who the order is assigned to | WEB |
| Details | The income account the sales are assign to | Internet Sales |
If you need to change any of the values (or add in your own rules or macros) you should customize the current view and change the default values assigned to the Fields shown above. For more information on how to change values in views click here.
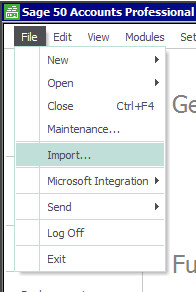
5 Select the File->Import menu option, shown below:
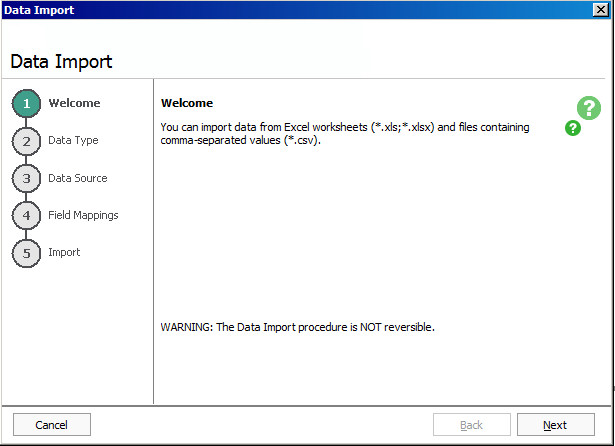
6 If you are shown the initial screen, click Next, shown below:
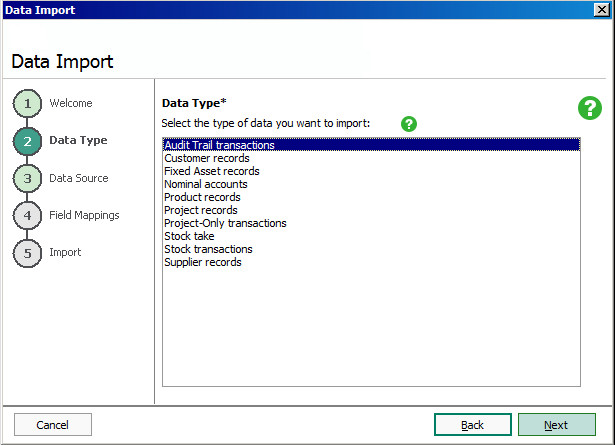
7 Select Audit Trail Transactions and click on Next.
8 Select the C:\OSOP\Sage.csv file.
9 This should then be imported.
Advanced information
The CSV file that is exported from One Stop Order Processing is created in the following format. This format is recognised by Sage.
|
Field |
Type |
Size |
Can this field be left blank? |
Format |
|
Transaction Type |
Text |
2 |
No |
This must be BP, BR, CP, CR, VP, VR, JC, JD, SI, SC, SA, SP, PI, PC, PA and PR. |
|
Account |
Text |
8 |
Yes, but only for JC and JD transactions. |
The account reference must already exist in your accounts data. |
|
Nominal Code |
Text |
8 |
No |
The nominal code must already exist in your accounts data. |
|
Department |
Integer |
3 |
Yes |
Must be a number between 0 - 999 with no decimal places. |
|
Date |
Date |
10.5 |
Yes - the current program date is used. |
This must be in the format DD/MM/YYYY. |
|
Reference |
Text |
30 |
Yes |
|
|
Details |
Text |
60 |
Yes |
|
|
Net |
Decimal |
11 |
No |
8 digits + 2 decimal places. |
|
T/C (Tax Code) |
Integer |
3 |
Yes - tax code T0 is used. |
This must be between T0 - T99. |
|
Tax |
Decimal |
11 |
Yes, however, if left blank the transaction imports with a VAT value of 0.00. |
8 digits + 2 decimal places. |
|
Exchange Rate |
Decimal |
11 |
No. If importing Base currency transactions the exchange rate is 1. |
8 digits + 2 decimal places. |
|
Ex.Ref |
Text |
30 |
Yes |
|
|
User Name |
Text |
32 |
Yes |
Related Articles
How to Export your orders into Xero
This feature is available in Professional, Premium and Managed versions of One Stop Order Processing This solution uses One Stop Order Processing and Xero You can import your Ebay, Amazon, X-Cart, eBid, SellerDeck, Actinic, Magento, CubeCart, ...How to import your osCommerce orders into One Stop Order Processing
How to import orders from osCommerce/CRE Loaded into One Stop Order Processing. This feature is available in the Lite, Professional, Premium and Managed subscriptions of One Stop Order Processing. How to download Orders from osCommerce/CRE Loaded- 1 ...How to import/add tracking details to orders in bulk from couriers?
The following article explains how to import/add tracking details to orders in bulk from the courier. This feature is available in the Lite, Professional, Premium and Managed subscriptions of One Stop Order Processing. In One Stop Order Processing, ...How to use different Account References when importing into Sage
The Sage view, by default, exports all orders into the WEB Account. If you use different currencies and want to put each currency into different accounts you can use the following default value of the Account Reference field to be : X[%Grand ...How to export orders to MetaPack
The following article explains how to manually export orders from One Stop Order Processing to MetaPack. This feature is available in Professional and�Premium versions of One Stop Order Processing For more information in Metapack use the following ...